U by Moen Support
Getting Started
Initial Controller Setup
Set up your shower controller by establishing controller settings, including language, time zone and optional Water Savings Mode.
- Start Your Controller: To begin, press the power button in the center of the button pad to start the initial setup process. You will be directed to the first setup screen.
- Select Language: Using the hot/cold arrow keys on the button pad to scroll up and down, select a language—English, French or Spanish. Press the identified outlet button (labeled “Done”) to confirm the highlighted selection and move to the next screen.
- Select Time Zone: Select your preferred temperature units, time zone and country using the hot/cold arrow keys to scroll. Press the identified outlet button (labeled “Done”) to confirm the highlighted selection and move to the next screen.
- Selecting Optional Water Savings Mode: Read the explanation about Water Savings Mode and select “Next.” If you want or are required to engage Water Savings Mode, select “Yes.” If not interested or required, select “No” to disable this mode. Press “Next” and then “Confirm” on the following screen.
Once all initial setup screens are completed, the system will go into stand-by mode and the shower will be ready to turn on.
Downloading the App
It's simple to download the U by Moen app to an iOS or Android mobile device from either the Apple App Store or the Google Play Store.
Downloading the iOS App
- First, open the Apple App Store on your iPhone. Next, search for “U by Moen shower” and click on the app to open a page with the app details. Then click the “GET” icon and press the “INSTALL” icon to download the app.
- Press the home button on your mobile device, find the recently downloaded U by Moen shower app and open the app by pressing the app icon on the screen.
- Once the app launches on the mobile device, follow the prompts to login (first time only) or create a new account.
- Select the “Create a new account” link near the bottom of the app. Follow the prompts to enter personal information (name, address, etc.) as well as an email address for the account. Then create a password for the account.
- A sign-in screen will greet you each time you open the app and provide a forgotten password option.
Downloading the Android App
- First, open the Google Play Store on your Android device. Next, search for “U by Moen shower” and click on the app to open a page with the app details. Then click the “INSTALL” icon to download the app.
- Press the home button on your mobile device, find the recently downloaded U by Moen shower app and open the app by pressing the app icon on the screen.
- Once the app launches on the mobile device, follow the prompts to login (first time only) or create a new account.
- Select the “Create a new account” link near the bottom of the app. Follow the prompts to enter personal information (name, address, etc.) as well as an email address for the account. Then create a password for the account.
- A sign-in screen will greet you each time you open the app and provide a forgotten password option.
Syncing the Mobile App to the Controller
Once an account has been created, the controller can be linked to the user's account and app.
- To sync a controller to the app, first open the app. If a controller hasn't been synced, the opening screen will ask you to add a device by clicking "Add Device."
- Once you have clicked the “Add Device” button, you will be directed through a number of steps to sync your controller to the app. The first step is to connect your mobile device to the temporary WiFi network for the controller.
- Once the mobile app is connected to the controller WiFi, you will input the name of the shower (e.g. Master Shower, Kids' Bathroom, Guest Bathroom, etc.), select your home WiFi network, enter your network password and sync the controller to the app using a security code.
- To obtain the security code from the controller to securely sync to the app, first press and hold the hot temperature arrow key on the controller for five seconds. The screen will then change to a bright red screen and display a unique PIN.
- Next, enter this PIN into the mobile app. Once all fields are filled in properly, the “Next” button will be enabled. You can then select the button to start the syncing process.
- Finally, you will see a pop-up box showing that the app and controller are syncing. Once the syncing is complete, you will see a pop-up window stating that the shower is set up.
- To add additional devices, simply go back to the home screen, click the “Add Device” button and follow the same steps outlined above.
Programming Settings from the App
Using the app, the “Settings” tab allows users to update certain system-wide settings unrelated to other personalized presets.
Creating a Title for the Shower Controller:
Shower controllers can be named after locations in the house for easy identification (e.g. Master Bathroom, Kids' Bathroom, Main Shower, etc.)
- To name a shower controller, click on the "Controller" row and a keyboard will appear at the bottom of the screen allowing you to name the controller.
- To pair the app with a second device, repeat the “Add a Device” process giving the additional controller a different name.
Selecting a WiFi Network for the Controller:
Clicking on the current WiFi network will permit the selection of a different network if needed.
Selecting Language and Unit Settings:
You can select a language from three options: English, French and Spanish. In addition, you can also select your time zone to display on the controller and set the displayed temperature to Celsius or Fahrenheit.
- During the initial install, a language was selected for the controller display. However, within the mobile app, the language can be modified by going to the “Settings” tab.
- The next available option is to choose the proper time zone, which is needed to accurately display the date and time on the controller. Without a time zone selection, the controller will not display a date or time.
- Finally, select the unit of measure for temperature.
Selecting Ambient Mode:
The U by Moen shower is in Ambient Mode when not being used. The factory default is that the screen will always be on.
- You can select the screen's appearance by clicking on the “Ambient Mode” row. This will lead to a screen where you can opt to “Turn off display when idle” by sliding the ball from left to right to increase brightness or from right to left to decrease brightness.
- To pair the app with a second device, repeat the “Add a Device” process giving the additional controller a different name.
Selecting Outlet Icons:
Within the “Settings” tab, you can modify which icons appear on the controller as well as the mobile app to best represent each of your shower fixtures such as showerheads, hand showers, body sprays and more. Simply drag and drop the icons to best represent the outlet functions in your shower.
Water Savings Mode Notification:
There are two different screen settings depending on whether or not Water Savings Mode was enabled on the in-shower controller at the time of installation.
- Enabled—if the setting is enabled, you can view an explanation and FAQs related to this setting.
- Not enabled—if the setting is not enabled, you can view an explanation and FAQs related to this setting.
Using the Controller
Starting Your Shower with the Power Button
Turning the shower on and off is controlled by the power button. You can also turn on the shower using the controller by simply pushing preset 1 or 2.
Pausing and Stopping Your Shower
To manually pause the shower, press each outlet button individually until all outlets are off. Pressing the power button will turn off the shower.
Selecting Water Temperature
The U by Moen shower valve will allow temperatures between 60 and 120 degrees. The default setting is 100 degrees.
- Select a desired water temperature (hotter or colder) by pressing the hot or cold arrow keys on the button pad. Each button press equals one degree of temperature change.
- The controller screen will change color from light blue to dark blue to purple to orange to red (based on target temperature) as the shower warms up to the desired temperature.
- Once the shower reaches the desired temperature, the screen will switch to white and you will hear a tone from the controller and see an on-screen notification that your shower is ready.
Adjusting Outlet Flow
The controller allows you to select which outlets are in use based on the number of outlets available (two or four).
Turning Off Outlets
- To turn off an outlet, press the corresponding outlet button.
- If all outlets are turned off by pressing the outlet buttons, the system will pause. When the shower is paused, the outlet icons on the screen (two or four depending on controller configuration) will flash, indicating you need to select which outlet you want on to restart the shower. Temperature and settings will be maintained until the shower is restarted by pressing any of the outlet buttons.
- If the system is left in the paused state, it will automatically shut off after five minutes.
Turning on Outlets:
- The shower is un-paused by pressing one of the outlet buttons; water will start flowing again at the previous water temperature setting.
- If the shower is set up to be in Water Savings Mode, only one outlet can be turned on at a time. Pressing another outlet will toggle the outlets from one to the other.
- The factory setting defaults to the top outlet (outlet A). Pressing another outlet button will turn on an additional outlet so that multiple outlets will be flowing (unless Water Savings Mode has been activated during initial setup).
Saving Controller Presets
You can program the two U by Moen shower controller preset buttons to each start a preferred shower experience, ready at the push of a button. Once you find the temperature you prefer and identify which outlets you want to have on, you can save those settings for future use.
- To save a preset, simply press and hold the desired preset button (1 or 2) for a few seconds to maintain the current settings.
- Once the settings are saved, you will hear a tone and see an on-screen notification. There will also be text in the bottom left of the screen indicating that these current shower settings reflect a preset. After a few seconds, the screen will transition back to the shower status screen.
Using the App
Starting Your Shower Remotely
With the U by Moen shower app, you can remotely start the shower from your smartphone. The smartphone and controller will always mimic each other. There are two primary ways to start the shower from your app:
With the On/Off button
- With the U by Moen shower app open, simply push the power button within the app's “Shower” tab to turn the shower on at the factory at the factory default setting of the primary outlet at 100 degrees (same as pushing the power button on the controller). The controller and app will mirror each other
From a preset within the app
- If you want to start the shower using a preset, simply press the preset button you want to use. The shower will turn on and configure to the settings saved within the selected preset.
Adjusting Temperature
- With the shower started, you can change the temperature through the smartphone app by pressing the hot (red) and cold (blue) arrow buttons to reach the desired temperature.
- Each press of the temperature buttons equates to a one-degree change in the shower temperature
Adjusting Outlets
With the shower running, turning on and off the shower outlets can be done through the smartphone app by simply pressing the desired outlet icon button within the app.
- If the outlet button is gray, pressing it will turn it on. If it is green, pressing it will turn it off.
- If all outlets are turned off (gray), the shower is paused, but it can be restarted by pressing any outlet icon (either through the app or within the shower or controller).
Creating and Editing Presets
The U by Moen shower app allows user to give each preset a name, which would correlate with an activity (e.g. workout) or a person (e.g. mom). You can also add a personalized greeting to appear on the controller. Based on the time of day, the controller greeting will read “Good Morning,” “Good Afternoon” or “Good Evening.” Users can enter something that will follow this greeting such as a first name or nickname like “Sweetheart.”
- From the smartphone app home screen, select the “Presets” tab. You will see the two default presets labeled “Preset 1 and Preset 2”) as well as an option to “Add a Preset.” The top two presets are linked to the 1 and 2 buttons on the controller.
- You can also create a new preset (up to 10 additional) in this menu. To edit a preset, tap the desired preset you want to customize.
- Now the “Preset Edit” screen will open. The first editable field is the “Title” of the preset. You can select any name you would like for this preset. A keyboard will open when they touch this field.
- The next editable field is the name you would like to follow the greeting on the controller. When you tap on this field, a keyboard will appear at the bottom of the app for entering a desired greeting name.
Programming a Timer
You can choose to have a timer display on the U by Moen shower controller to help manage your time in the shower. Your timer will countdown from whatever time you choose as zero. With one minute remaining, you will hear a tone on the controller signaling your time is almost up.
- First, tap the “Timer” row to open the “Timer Edit” screen.
- Within the “Timer Edit” screen, turn on the timer by sliding the ball from left to right.
- Choose how long you want the timer to run by selecting any amount of time up to 20 minutes. You can scroll through minutes and seconds individually to select the desired timer length.
- Next, select what happens to signal the timer has reached zero. The first option is an audible tone from the controller; this is the factory default. Sliding the ball from right to left will turn the tone off if you prefer no alarm.
- The factory default is for the shower to continue running when the timer reaches zero. If you would like the shower to turn off when the timer reaches zero, slide the ball from left to right to activate this function.
- Once all the timer settings are finalized, push the “Done” button to preserve these settings and move back to the “Preset Edit” screen.
Creating an Alert When Shower is Ready
There are three notification signaling options to let you know when your shower is ready. All three options are independent of each other, so users can choose any combination to create their personalized U by Moen shower experience. To turn off any of the alerts, slide the ball from right to left.

Sound Alert
Tone from the controller. The factory default is for this setting to stay on.

Smartphone Notification
Receive a smartphone notification when your shower is ready.

Pausing Shower
The shower pause when it reaches the desired temperature
- Once you've personalized the preset, press the “Done” button to save your settings and move back to the “Preset Home” screen.
Modifying Preset Order
You have the option to change the order of your presets from within the app and to change which presets are synced to the 1 and 2 buttons on the controller. In addition to managing the order of existing presets, you can also create new presets from this menu and select which ones are app-only and which are synced with the controller.
- First, make sure the shower is off. From the “Presets” tab of the smartphone app, you should click the “Edit” button. You will see three bars added to the right side of each preset.
- Next, press and hold the three bars for whichever preset you want to move and drag the preset to its new desired location. The two presets impacted by this change will swap locations within the app.
- Once you’ve completed all the adjustments to the order of the presets, press the “Done” button. To create a new preset, you should go into the “Presets” tab of the smartphone app and click on the add “Add a Preset” bar within the “APP ONLY” section.
Starting Shower with App-Only Preset
To start the shower using one of the “APP ONLY” presets, swipe up from anywhere on the “Shower” tab screen to make the “APP ONLY” presets visible. From there, tap on any preset you would like to use to start the shower remotely.
Selecting a WiFi Network
Clicking on the current WiFi network will permit the selection of a different network if necessary.
Changing Language and Temperature Units
You can select a language from three options: English, French and Spanish. In addition, you can also select your time zone to display on the controller and set the displayed temperature to Celsius or Fahrenheit.
- During the initial install, a language was selected for the controller display. However, within the mobile app, the language can be modified by going to the “Settings” tab.
- The next available option is to choose the proper time zone, which is needed to accurately display the date and time on the controller. Without a time zone selection, the controller will not display a date or time.
- Finally, select the unit of measure for temperature.
Checking Water Savings Mode
Water Savings Mode Notification: There are two different screen settings depending on whether or not Water Savings Mode was enabled on the in-shower controller at the time of installation.
- Enabled—if the setting is enabled, you can view an explanation and FAQs related to this setting.
- Not enabled—if the setting is not enabled, you can view an explanation and FAQs related to this setting.
Installation
Before You Install
Before installing the U by Moen shower system, it’s important to consider a few key factors such as the number of shower outlets the homeowner intends to use in the shower, valve placement, location of a usable electrical outlet and strength of WiFi signal.
Installation Video
Valve Placement
-
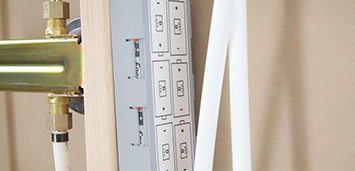
Unlike traditional valves, the U by Moen shower digital valve does not have to be placed directly behind the shower wall. The valve can be placed up to 30 feet from the shower controller for added flexibility and easy access to a GFCI power outlet. Example of valve between studs.
-
Aside from being connected to a GFCI outlet, the only requirement is that the valve be accessible and not completely closed behind a wall. Options include adding an access panel in the wall to reach the valve or placing the valve in a closet, vanity or other form of accessible cavity. Example of access panel in closet.
-
Risk of Damage to Product: The power supply and valve must not be installed where the ambient temperature can exceed 104 degrees or where freezing can occur.
Other Requirements
Data Cable Connections
A 30-foot data cable connects the valve to the controller allowing for flexibility of install locations.
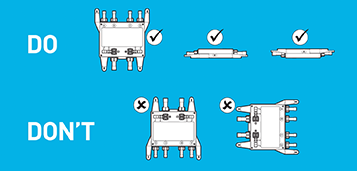
Valve Orientations
Make sure the valve is installed within one of the approved orientations.

Outlet Connections
When plumbing the outlets align the A to D outlets on the valve to the desired A-D outlet buttons on the controller.
Battery Backup Kit
With the Battery Backup Kit, you will never have to worry about the your shower not working if the power goes out.
Electrical Requirements
To determine the correct electrical placement, follow these steps:
WARNING: You must determine the location of the valve and electrical supply (GFCI) to allow for adequate slack in the 6-ft. (1.82 m) power cord from the bottom of the valve. A drip loop in the power cord is required at the valve connection.
-
Find the Outlet: Locate electrical outlet above the valve.
-
Connect the Circuit: Connect only to circuits protected by a Ground-Fault-Circle Interrupter (GFCI) or an Earth-Leakage Circuit Breaker (ELCB). Grounding is required. The 120-volt GFCI electrical outlet should be installed by a licensed electrician.
-
Cable Management: To avoid risk of electrical shock and /or product damage, route power and data cables to avoid contact with hot water supply lines. Power and data cables must also be routed to avoid damage when installing the valve or controller installation screws.
Plumbing Requirements
The valve is shipped in the open position allowing the installer to test the plumbing connections with air or water prior to connecting the controller. It’s important to adhere to the following plumbing requirements during installation:
-
Plumb outlet A of the valve to the primary showerhead.
-
Use dedicated 1/2” supply lines for the S3102 valve and 3/4” supply lines for the S3104 valve. In-line shutoffs are required.
-
Make connections at water inlet and outlet lines flexible enough to allow for valve servicing.
-
The valve is supplied in the open position to allow for pressure testing of connections. Note: The controller is not required to test plumbing.
-
Plug any unused outlets.
Water Requirements
Proper U by Moen shower operation requires the following:
-
Minimum incoming temperature of 40°F (5°C).
-
Maximum incoming temperature of 149°F (65°C).
-
Minimum incoming pressure of 20 psi.
-
Maximum incoming pressure of 125 psi.
-
Maximum outlet temperature is set to 115°F and cannot be adjusted higher than 120°F.
-
Note: the valve will not allow the user to exceed 120°F.
-
Water flow rates (at 45 psi): 2-outlet system: max flow of 6 gallons per minute (gpm) per outlet with a system max of 9 gpm. 4-outlet system: max flow of 6 gpm with a system max of 14 gpm.
Typical Vertical Spa Options
There are many different ways a homeowner can configure his/her 2- or 4- outlet U by Moen shower to create a personalized in-home spa experience. The following diagrams depict three common setups that will appeal to most homeowners, as well as a few options to consider.
2-Outlet Showerhead & Hand Shower
This simple setup allows the user to have ideal personalized shower control for a showerhead/hand spray combination.
4-Outlet Showerhead, Handshower & Two Sets of Body Sprays
This setup is perfect for homeowners who desire body sprays, which can be placed either in the back wall of the shower or on the two side walls.
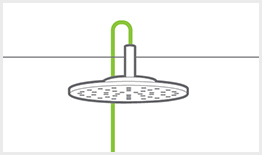
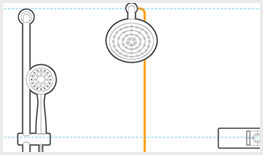
Rain Showerhead, Handshower & One Set of Body Sprays
This configuration offers the ultimate rain shower spa experience by placing a shower head directly above the user.
Valve Installation and Mounting
The U by Moen shower digital valve is installed prior to the wall-mounted controller. Be sure to pay attention to the maximum distance the valve can be installed from the controller as part of the preparation process. Be sure the valve is mounted with the proper orientation. Download Valve Installation Guide
-
Prep Valve: Shutoffs are required for installation and/or servicing of shower valve. Turn both shut-off valve handles to the off position.
-
Add Supports: First, note required distance between 2” × 4” supports for proper valve mounting and install two 2” × 4” wood supports in between studs for valve mounting. Then secure each support with wood screws (not provided).
-
Mount Valve: Mount shower valve (F) to both wood supports as shown. Shower valve should rest on lower wood support.
-
Secure Valve: Use provided shower valve mounting screws (L) to secure shower valve (F); tighten screws.
-
Outlet Caps: Remove and discard outlet protective caps (B) from top of shower valve. Then remove and discard inlet protective caps (I) from bottom of shower valve.
-
Connections: Make plumbing connections to inlets and outlets as determined. Plumb outlet A to the primary showerhead.
-
Unused Outlets: Plug any unused outlets (outlet cap [A] not included).
-
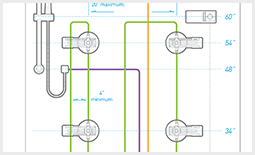
Controller Support: Identify desired controller location and install a 2” × 4” wood support approximately 60” high for mounting controller. Secure the support with wood screws, then drill a 1¼” hole through the middle. Refer to the diagram for detailed instructions.
-
Connecting Data Cable: Note cable connector ends; connect valve end to valve. Guide the data cable (P) through the hole in the wood support. Attach the data cable retainer to the controller end of the data cable to prevent it from falling back into the wall. Insert the other end of the cable into the data port at the bottom of the valve.
-
Connecting Power Plug: Plug AC power adapter (K) into AC outlet within wood studs. Ensure that AC power adapter is within 5 ft. (152 cm) of the shower valve (F) and has continuous power. Insert plug into port underneath shower valve.
Controller Installation and Mounting
The U by Moen shower digital controller mounts easily and connects to the digital valve through a waterproof data cable. A minimum space of 10 x 6 is required for the controller either inside the shower or on an easily accessible wall adjacent to the shower (in-shower is recommended). The controller can only be mounted in the horizontal position. Download Controller Installation Guide
-
For controller setup, including language, time zone, water temperature scale and water saving mode, see the Using the Controller section.
-
Be sure to reference the recommended mounting dimensions diagram before beginning to install the controller.
How to Install the Controller:
-
Mounting Bracket: Finished wall should have a 1” hole for the data cable. Make sure the data cable (B) has been pulled through the wall with slack and make certain that the data cable doesn’t fall behind the wall. Next, level the mounting bracket (A) on the finished wall and mark drill holes within the bracket. Set mounting bracket (A) aside.
-
Mounting Bracket Installation Prep: Drill both marked holes using a 3/16” drill bit. Note: Only drill through finished wall.
-
Mounting Bracket Installation: Apply a bead of silicone caulking within the mounting bracket (A) groove. Adhere bracket to finished wall. Ensure data cable (B) goes through bracket opening. Secure with screws and check that the bracket is level.
-
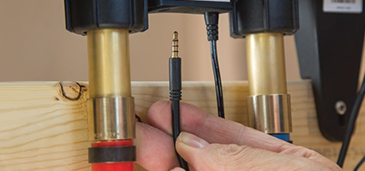
Connect Data Cable: Remove and discard protective cap from data cable (B) and attach cable from controller cable (D) to data cable (B).
-
Mount Controller: Feed cabling connection (B & D) back into the wall through the mounting bracket (A). Then attach controller (E) to bracket (A) as shown. Fully engage controller by sliding it down into place. Installation is complete.
FAQs
Find answers to frequently asked questions about U by Moen Smart Shower.
Learn More